Architecting and Operating OpenShift Cluster
Table of Contents
1 Networking
1.1 Overview
- Cluster
- The set of machines in the cluster. i.e. the Masters and the Nodes.
- Master
- A controller of the OpenShift Container Platform cluster. Note that the master may not be a node in the cluster, and thus, may not have IP connectivity to the pods.
- Node
- Group of containers running on a node, managed by OpenShift Container Platform.
- Service
- Abstraction that presents a unified network interface that is backed by one or more pods.
- Router
- A web proxy that can map various URLs and paths into OpenShift Container Platform services to allow external traffic to travel into the cluster.
- Node Address
- The IP address of a node. This is assigned and managed by the owner of the network to which the node is attached. Must be reachable from any node in the cluster (master and client).
- Pod Address
- The IP address of a pod. These are assigned and managed by OpenShift Container Platform. By default they are assigned out of the 10.128.0.0/14 network. Only reachable from the client nodes.
- Service Address
- An IP address that represents the service, and is mapped to a pod address internally. These are assigned and managed by OpenShift Container Platform. By default they are assigned out of the 172.30.0.0/16 network. Only reachable from the client nodes.
The following diagram shows all of the pieces involved with external access:
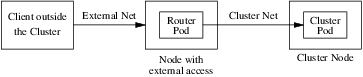
Figure 1: Traffic Path
1.2 SDN Flows Inside Nodes
In the default configuration, the cluster network is the 10.128.0.0/14 network, and node allocated /23 subnets (i.e., 10.128.0.0/23, 10.128.2.0/23, 10.128.4.0/23, and so on). This means that the cluster network has 512 subnets available to assign to nodes, and a given node is allocated 510 addresses that it can assign to the containers running on it. The size and address range of the cluster network are configurable, as is the host subnet size.
[root@master ~]# view /etc/origin/master/master-config.yaml
networkConfig:
  clusterNetworks:
  - cidr: 10.128.0.0/14
    hostSubnetLength: 9
  externalIPNetworkCIDRs:
  - 0.0.0.0/0
  networkPluginName: redhat/openshift-ovs-subnet
  serviceNetworkCIDR: 172.30.0.0/16

[root@master ~]# oc get hostsubnet
NAME                     HOST                     HOST IP         SUBNET          EGRESS CIDRS   EGRESS IPS
infra.myopenshift.com    infra.myopenshift.com    192.168.23.52   10.129.0.0/23   []             []
master.myopenshift.com   master.myopenshift.com   192.168.23.31   10.128.0.0/23   []             []
node.myopenshift.com     node.myopenshift.com     192.168.23.51   10.130.0.0/23   []             []
node2.myopenshift.com    node2.myopenshift.com    192.168.23.32   10.128.2.0/23   []             []
node3.myopenshift.com    node3.myopenshift.com    192.168.23.33   10.131.0.0/23   []             []
node4.myopenshift.com    node4.myopenshift.com    192.168.23.34   10.129.2.0/23   []             []
OpenShift SDN creates and configures three network devices:
- br0
- the OVS bridge device that pod containers will be attached to. OpenShift SDN also configures a set of non-subnet-specific flow rules on this bridge.
- tun0
- an OVS internal port (port 2 on br0). This gets assigned the cluster subnet gateway address, and is used for external network access. OpenShift SDN configures netfilter and routing rules to enable access from the cluster subnet to the external network via NAT.
- vxlan_sys_4789
- The OVS VXLAN device (port 1 on br0), which provides access to containers on remote nodes. Referred to as vxlan0 in the OVS rules.
For each Pod in the Node, the local OpenShift creates a vethXX interface and assign it to the OVS br0. The vxlan_sys_4789 of br0 is the interface that defines the VXLAN tunnels, or the overlay network, that enables the communication between local Pods with Pods in remote Nodes. This interface is known as vxlan0 interface inside the OVS and that is the name used in the OpenFlow entries. The tun0 interface gets the local cluster network subnet gateway address. This is the interface that provide NAT access from the cluster network subnet to the external network. In additional to the local cluster network subnet gateway address, on each Node the Kubernetes Service objects network is also pointed to the tun0 interface.

Figure 2: OpenShift Network & VxLan
[root@node ~]# ifconfig tun0
tun0: flags=4163<UP,BROADCAST,RUNNING,MULTICAST>  mtu 1450
        inet 10.129.0.1  netmask 255.255.254.0  broadcast 10.129.1.255
        ...

[root@node ~]# ip route
default via 192.168.16.1 dev ens192
10.128.0.0/14 dev tun0 scope link                                     # This sends all pod traffic into OVS
169.254.0.0/16 dev ens192 scope link metric 1002                      # This is for Zeroconf
172.17.0.0/16 dev docker0 proto kernel scope link src 172.17.0.1      # Docker's private IPs... used only by things directly configured by docker; not OpenShift
172.30.0.0/16 dev tun0                                                # To the Kubernetes Service objects network
192.168.16.0/20 dev ens192 proto kernel scope link src 192.168.23.31  # The physical interface on the local subnet
192.168.122.0/24 dev virbr0 proto kernel scope link src 192.168.122.1 # Linux virtual network switch (use NAT mode) for hypervisor
The default OpenShift Router is one or more Router Pods running on
Infrastructure Nodes (infra.myopenshift.com) and is deployed as a Deployment
Config (deploymentconfig.apps.openshift.io/router). Sharing the Network
Namespace enables these Router Pods to receive traffic over the
host-network. By default, the OpenShift Router listens on TCP ports 80
(HTTP), 443 (HTTPS), and 1936 (HAProxy Stats). Once the traffic arrives to the
Pod, it will match the corresponding Route object.
[root@master ~]# oc get all --selector='router=router' -n default -o wide
NAME                 READY     STATUS    RESTARTS   AGE       IP              NODE                    NOMINATED NODE
pod/router-1-qv5f7   1/1       Running   1          5d        192.168.23.52   infra.myopenshift.com   <none>

NAME                             DESIRED   CURRENT   READY     AGE       CONTAINERS   IMAGES                                                   SELECTOR
replicationcontroller/router-1   1         1         1         5d        router       registry.redhat.io/openshift3/ose-haproxy-router:v3.11   deployment=router-1,deploymentconfig=router,router=router

NAME             TYPE        CLUSTER-IP      EXTERNAL-IP   PORT(S)                   AGE       SELECTOR
service/router   ClusterIP   172.30.210.30   <none>        80/TCP,443/TCP,1936/TCP   5d        router=router

NAME                                        REVISION   DESIRED   CURRENT   TRIGGERED BY
deploymentconfig.apps.openshift.io/router   1          1         1         config
Pod to pod in the same node
eth0 (pod) \(\rightarrow\) vethA \(\rightarrow\) br0 \(\rightarrow\) vethB \(\rightarrow\) eth0 (pod)
Pod to pod in the different nodes
eth0 (pod) \(\rightarrow\) vethA \(\rightarrow\) br0 \(\rightarrow\) vxlan0 \(\rightarrow\) network \(\rightarrow\) vxlan0 \(\rightarrow\) br0 \(\rightarrow\) vethB \(\rightarrow\) eth0 (pod)
Pod to external host
eth0 (pod) \(\rightarrow\) vethA \(\rightarrow\) br0 \(\rightarrow\) tun0 \(\rightarrow\) \(\texttt{SNAT} \atop \texttt{(MASQUERADE)}\) \(\rightarrow\) eth0 (phy.) \(\rightarrow\) Host
2 Build & deploy docker image
2.1 Setup the proxy
oc describe svc/docker-registry -n default
...
Type:              ClusterIP
IP:                172.30.151.16

cat ~/.docker/config.json
...
"proxies": {
    "default": {
        "httpProxy": "http://proxy.myopenshift.com:8888",
        "httpsProxy": "http://proxy.myopenshift.com:8888",
        "noProxy": "*.bocmo.com,.bocmacau.com,.myopenshift.com,172.30.151.16"
    }
}

systemctl daemon-reload
systemctl restart docker

docker login registry.redhat.io
Username:
Password:
Login Succeeded

docker pull registry.redhat.io/rhel7
docker images
registry.redhat.io/rhel7

# Get the image path
docker info
...
Docker Root Dir: /var/lib/docker

...
2.2 Create docker image
mkdir -p /opt/docker/test
cd /opt/docker/test

vi Dockerfile
# This Dockerfile uses the rhel7 image
# Ahthor: Cun Gong
FROM rhel7:latest
RUN yum install -y nc
CMD /bin/sh

docker build -t rhel7:v1 .
docker ps # get the container-id
docker run --rm -it <container-id> sh
sh-4.2# type nc

## Web test by ncat
cd /opt/docker/test
git init
git add ./Dockerfile
git commit -m"rhel7:v1"

cat Dockerfile
# This Dockerfile uses the rhel7 image
# Ahthor: Cun Gong
FROM rhel7:v1
COPY ./index.http /index.http
COPY ./ncat-web.sh /ncat-web.sh
RUN chmod 755 ncat-web.sh
EXPOSE 8080
ENTRYPOINT ["/ncat-web.sh"]

# Build
docker build -t rhel7:v2 .

# Server terminal
docker run -it --rm -P rhel7:v2
# Client terminal
docker ps
... rhel7:v2 ... 0.0.0.0:32769->8080/tcp
curl -v -k localhost:32769
2.3 Delete container & images
# Delete containers
docker ps --all | grep rhel
docker container kill <id>
docker rm -v <id> <id> ...

# Delete images
docker images
docker rmi rhel7:v2
2.4 Push docker images to OpenShift internal registry
oc login -u system:admin -n default

oc describe svc/docker-registry -n default
Type:              ClusterIP
IP:                172.30.151.202
Port:              5000-tcp  5000/TCP
TargetPort:        5000/TCP

oc adm policy add-scc-to-user anyuid -z default
scc "anyuid" added to: ["system:serviceaccount:hello:default"]

# check permission (no use)
oc edit scc anyuid

# Just for debug (no use)
#oc adm policy add-role-to-user edit system
#oc adm policy remove-role-from-user edit system

## Re-setup the docker proxy
# Retrieve the registry service’s IP address
oc describe svc/docker-registry -n default
vi /etc/sysconfig/docker
NO_PROXY=...,${docker-registry.default.svc}

systemctl restart docker

oc login -u system -p admin
oc new-project hello
docker tag rhel7:v2 172.30.151.202:5000/hello/rhel7:v2
docker login -p `oc whoami -t` -u system 172.30.151.202:5000
docker push 172.30.151.202:5000/hello/rhel7:v2

oc new-app hello/rhel7:v2 --name=myapp

oc expose svc/myapp
oc get svc/myapp -o wide

oc get routes
myapp-hello.apps.myopenshift.com

curl -v -k myapp-hello.apps.myopenshift.com
3 Re-deploy the application
Create new image:
docker run -it --rm rhel7:v1
sh-4.2# yum install net-tools.x86_64 -y
sh-4.2# ifconfig eth0
sh-4.2# ifconfig eth0 | sed -n 's/^[[:space:]]*inet \(.*\)  netmask.*/\1/p'
Push the new image to docker-registry:
# oc login -u system -p admin

# docker commit 2b8553a3eecc rhel7:v3
sha256:72f98ecf35e5b9ee116dc157d44959cc17f1ace8a6b2ad2cf074a784f2154ea3

# docker tag rhel7:v3 172.30.151.202:5000/hello/rhel7:v3
# docker login -p `oc whoami -t` -u system 172.30.151.202:5000
# docker push 172.30.151.202:5000/hello/rhel7:v3
The push refers to a repository [172.30.151.202:5000/hello/rhel7]
04a942261f21: Pushed
4ae10724cbf6: Layer already exists
d02565babdb9: Layer already exists
49577de67301: Layer already exists
v3: digest: sha256:bfbe84b4d8fa134cef339e5c690243d9d32345ad49742646cabcdebdc4d33176 size: 1163
Build new image again:
[root@master test]# cat ncat-web.sh
#!/bin/sh
ip=`ifconfig eth0 | sed -n 's/^[[:space:]]*inet \(.*\)  netmask.*/\1/p'`
sed -i "s/_IP_/$ip/g" /index.http
while true; do nc -4l 8080 -c "cat /index.http"; done

[root@master test]# cat Dockerfile
# This Dockerfile uses the rhel7 image
# Ahthor: Cun Gong
FROM rhel7:v3
COPY ./index.http /index.http
COPY ./ncat-web.sh /ncat-web.sh
RUN chmod 755 ncat-web.sh
EXPOSE 8080
ENTRYPOINT ["/ncat-web.sh"]


[root@master test]# docker build -t rhel7:v4 .

# docker tag rhel7:v4 172.30.151.202:5000/hello/rhel7:v4
# docker login -p `oc whoami -t` -u system 172.30.151.202:5000
# docker push 172.30.151.202:5000/hello/rhel7:v4
Delete & re-create new app:
# Delete app
oc delete all --selector app=myapp

# Create app
oc new-app hello/rhel7:v4 --name=myapp

oc expose svc/myapp
oc get svc/myapp -o wide

oc get routes
myapp-hello.apps.myopenshift.com

curl -v -k myapp-hello.apps.myopenshift.com
Scaling up the application:
# Get all resource objects
oc get all -o name --selector app=myapp -o wide

# Scaleup deploymentconfig
oc get dc
oc scale --replicas=4 dc/myapp
oc get dc

oc get pods -o wide
# NAME            READY     STATUS    RESTARTS   AGE       IP           NODE                    NOMINATED NODE
# myapp-1-4p4qf   1/1       Running   0          53s       10.131.0.2   node3.myopenshift.com   <none>
# myapp-1-7ds2f   1/1       Running   0          53s       10.129.2.2   node4.myopenshift.com   <none>
# myapp-1-7px65   1/1       Running   0          53s       10.128.2.3   node2.myopenshift.com   <none>
# myapp-1-rbgwd   1/1       Running   0          6m        10.130.0.4   node.myopenshift.com    <none>
4 Getting traffic into a cluster
4.1 Allow user with cluster admin role
oc login -u system:admin -n hello
oc adm policy add-cluster-role-to-user cluster-admin system
4.2 Defining the public IP range
oc login -u system -p admin
oc project hello
Configure the externalIPNetworkCIDRs parameter in the
/etc/origin/master/master-config.yaml file as shown (default is 0.0.0.0/0):
networkConfig:
  externalIPNetworkCIDRs:
  - <ip_address>/<cidr>
Restart the OpenShift Container Platform master service to apply the changes.
master-restart api
master-restart controllers
4.3 Create a Project and Service
docker build -t rhel7:v5 .
docker tag rhel7:v5 172.30.151.202:5000/hello/rhel7:v5
docker login -p `oc whoami -t` -u system 172.30.151.202:5000
docker push 172.30.151.202:5000/hello/rhel7:v5
oc new-app hello/rhel7:v5 --name=myecho
oc get svc
ncat <cluster-ip> 8080

# Expose the service to crete route
oc expose svc/myecho
oc get svc
nc myecho-hello.apps.myopenshift.com 8080
# failed: Ncat: No route to host.

# Assigning an IP Address (infra. node ip) to the Service
oc patch svc myecho -p '{"spec":{"externalIPs":["192.168.23.52"]}}'
oc get svc
# NAME      TYPE        CLUSTER-IP       EXTERNAL-IP     PORT(S)    AGE
# myecho    ClusterIP   172.30.51.131    192.168.23.52   8080/TCP   6m

nc 192.168.23.52 8080
oc scale --replicas=4 dc/myecho
oc get dc
5 Test pod services & attach NFS
5.1 Configure NFS server/client
In the server:
# Enable NFS service and allow iptable rules
systemctl enable nfs-server
systemctl enable rpcbind
systemctl enable nfs-lock
systemctl enable nfs-idmap

vi /etc/sysconfig/nfs
# ...
# LOCKD_TCPPORT=32803
# LOCKD_UDPPORT=32769
# MOUNTD_PORT=892
# STATD_PORT=662

grep -w -e 111 -e 2049 /etc/services

systemctl restart rpcbind
systemctl restart nfs-server
systemctl restart nfs-lock
systemctl restart nfs-idmap

rpcinfo -p | grep -E '(rquota|mount|nlock)'

iptables -I INPUT -i ens192 -p tcp -s 192.168.23.0/24 -m multiport --dport 111,2049,32803,32769,892,662 -j ACCEPT
iptables -I INPUT -i ens192 -p udp -s 192.168.23.0/24 -m multiport --dport 111,2049,32803,32769,892,662 -j ACCEPT

iptables-save

# Setup /etc/exports & enable anonymity access
mkdir -p /ose/public
setfacl -m u:nobody:rwx /ose/public
getfacl /ose/public
ls -lZd /ose/public
vi /etc/exports
# /ose/public 192.168.23.0/24(rw,all_squash,anonuid=99,anongid=99) *(ro)

# Exporting the share:
exportfs -r
# '-r' re-exports entries in /etc/exports and sync /var/lib/nfs/etab with /etc/exports.

# Restart the NfS services:
systemctl restart nfs-server
In the client:
mount -t nfs nfs.myopenshift.com:/ose/public /mnt
(hostname; date) >/mnt/test.txt
5.2 Configure OpenShift persistent storage (NFS)
You must first create an object definition for the PVs (Persistent Volumes):
apiVersion: v1
kind: PersistentVolume
metadata:
  name: nfs01
spec:
  capacity:
    storage: 30Gi
  accessModes:
  - ReadWriteOnce
  nfs:
    path: /ose/public
    server: nfs.myopenshift.com
  persistentVolumeReclaimPolicy: Retain
Create the PV:
oc create -f ./nfs-pv.yaml
oc get pv
The next steps can be to create a PVC (persistent volume claims), to provide a convenient method for sharing a volume across a project:
apiVersion: v1
kind: PersistentVolumeClaim
metadata:
  name: nfs-claim01
spec:
  accessModes:
    - ReadWriteOnce
  resources:
    requests:
      storage: 1Gi
Create the PVC:
oc create -f ./nfs-pvc.yaml
oc get pvc
# NAME          STATUS    VOLUME    CAPACITY   ACCESS MODES   STORAGECLASS   AGE
# nfs-claim01   Bound     nfs01     30Gi       RWO                           11s
Add the volume to pod in management console, OpenShift will terminate old pods and create new pods (rolling out).
6 Migrate the PuzzleBrain to OpenShift
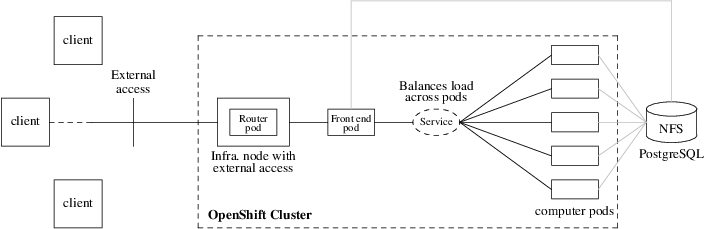
Figure 3: PuzzleBrain in OpenShift
6.1 Install build tools
# Install GCC and C++
yum group list
yum group install "Development Tools" -y
6.2 Build PuzzleBrain
6.2.1 Install rapidjson
cd /opt
git clone https://github.com/Tencent/rapidjson.git
yum install -y cmake valgrind
cd ./rapidjson
git submodule update --init
mkdir build
cd build/
cmake ..
make
make test
make install
6.2.2 Install PuzzleBrain
mkdir -p /ose/Develop
cd /ose/Develop
git clone https://github.com/GongCun/Pentomino.git
cd Pentomino
git branch -a
git checkout map
make puzzler
make -B -f ./Makefile.opt puzzler
cp -p ./puzzler /opt/docker/PuzzleBrain
sed -i 's/
//g' ./run2.sh
6.2.3 Build puzzle docker image
cd /opt/docker/PuzzleBrain
# Edit the run.sh, puzzle-entry.sh, and Dockerfile
docker build -t puzzle:v1 .
docker tag puzzle:v1 172.30.151.202:5000/hello/puzzle:v1
docker login -p `oc whoami -t` -u system 172.30.151.202:5000
docker push 172.30.151.202:5000/hello/puzzle:v1
oc new-app hello/puzzle:v1 --name=puzzle
oc expose svc/puzzle
# Attach the NFS volume by web console
oc set volume dc --all
oc rsh <pod>
oc exec <pod> -- df -h /data
#Filesystem                       Size  Used Avail Use% Mounted on
#nfs.myopenshift.com:/ose/public   30G   32M   30G   1% /data

# Scaleup the pods
oc scale --replicas=4 dc/puzzle
# Expose to external (not necessary)
oc patch svc puzzle -p '{"spec":{"externalIPs":["192.168.23.52"]}}'
6.2.4 Testing in intra-net
mkdir -p /opt/docker/PuzzleBrain/tmp
cd /opt/docker/PuzzleBrain/tmp
../puzzler -m -b4 -s ${PUZZLE_CLUSTER} -p 3001
6.2.5 Setup pod-autoscaling
In OpenShift 3.11 heapster, and the other metrics components, have been
deprecated in favor of Prometheus (for metrics and monitoring) and the
metrics-server component for providing metrics data to the Horizontal Pod
Autoscaler and oc adm top command.
Add the following option in ansible hosts to install the metrics-server:
# vi /etc/ansible/hosts
...
openshift_metrics_server_install=true
openshift_metrics_install_metrics=true
Install the OpenShift Metrics Service:
# Switch to the openshift-infra project
oc project openshift-infra

# Run playbook in master-node as follows:
cd /usr/share/ansible/openshift-ansible
ansible-playbook \
    -i /etc/ansible/hosts playbooks/openshift-metrics/config.yml \
    -e openshift_metrics_server_install=True \
    -e openshift_metrics_install_metrics=True

# Use 'watch' to check the status of pods every two seconds
watch oc get pods -n openshift-infra

# Check if the openshift metrics server is installed
oc get pods -n  openshift-metrics-server

# Check the top of pod & node
oc adm top pod
oc adm top node
In OpenShift, a resource request is a threshold you can set that affects scheduling and quality of service. It essentially provides the minimum amount of resources guarantee to the pod. CPU is measured in units called millicores (one-thousandth of a core). By default, pods don't get individual cores; they get time-slices of CPU, sharing the cores on the node with other pods. If a particular node has four CPUs assigned to it, then 4000 millicores are available to all the running pods on that node:
cat /proc/cpuinfo | grep -wc '^processor'
Resource requests also can be combined with a resource limit, which is similar to a request but sets the maximum amount of resources guaranteed to the pod. Setting requests and limits also allows the user to set a quality of service level by default:
- BestEffort
- Neither a resource nor a limit is specified. This is for low-priority applications that can live with very low amounts of CPU and memory.
- Burstable
- Provided when a request is specified that is less than an optionally specified limit.
- Guaranteed
- A request and a limit are both set to the same number. This is for the highest-priority applications that need the most consistent amount of computing power.
Setting a lower quality of service gives the scheduler more flexibility by
allowing it to place more pods in the cluster. Setting a higher quality of
service limits flexibility but gives applications more consistent resources.
Because choosing the quality of service is about finding reasonable defaults,
most applications should fall into the Burstable tier.
Define the resource limits:
oc set resources dc/puzzle-autoscale \
   --requests=cpu=200m,memory=256Mi \
   --limits=cpu=2000m,memory=4096Mi
Check the resources limits:
oc describe dc/puzzle-autoscale
If want to define the horizontal pod autoscaler HPA, must define the resource request first. Define the HPA:
oc autoscale dc/puzzle-autoscale --min 1 --max 8 --cpu-percent=75
Observe the HPA:
# oc get hpa/puzzle-autoscale --watch
NAME               REFERENCE                           TARGETS   MINPODS   MAXPODS   REPLICAS   AGE
puzzle-autoscale   DeploymentConfig/puzzle-autoscale   0%/75%    1         8         2          55s

# watch oc describe hpa/puzzle-autoscale

Name:                                                  puzzle-autoscale
Namespace:                                             openshift-infra
Labels:                                                <none>
Annotations:                                           <none>
CreationTimestamp:                                     Mon, 09 Mar 2020 22:16:26 +0800
Reference:                                             DeploymentConfig/puzzle-autoscale
Metrics:                                               ( current / target )
  resource cpu on pods  (as a percentage of request):  245% (490m) / 75%
Min replicas:                                          1
Max replicas:                                          8
DeploymentConfig pods:                                 4 current / 8 desired
Conditions:
  Type            Status  Reason            Message
  ----            ------  ------            -------
  AbleToScale     True    SucceededRescale  the HPA controller was able to update the target scale to 8
  ScalingActive   True    ValidMetricFound  the HPA was able to successfully calculate a replica count from cpu resource utilization (percentage of request)
  ScalingLimited  True    TooManyReplicas   the desired replica count is more than the maximum replica count
Events:
  Type    Reason             Age   From                       Message
  ----    ------             ----  ----                       -------
  Normal  SuccessfulRescale  8m    horizontal-pod-autoscaler  New size: 1; reason: All metrics below target
  Normal  SuccessfulRescale  3m    horizontal-pod-autoscaler  New size: 4; reason: cpu resource utilization (percentage of request) above target
  Normal  SuccessfulRescale  19s   horizontal-pod-autoscaler  New size: 8; reason: cpu resource utilization (percentage of request) above target
Do the benchmark in client:
cd /opt/docker/PuzzleBrain/test
../puzzler -m -b8 -s 172.30.255.172 -p 3001 &
../puzzler -m -b8 -s 172.30.255.172 -p 3001 &
../puzzler -m -b8 -s 172.30.255.172 -p 3001 &
../puzzler -m -b8 -s 172.30.255.172 -p 3001 &
../puzzler -m -b8 -s 172.30.255.172 -p 3001
Observe the status:
# watch oc get pods -l app=puzzle-autoscale

NAME                       READY     STATUS             RESTARTS   AGE
puzzle-autoscale-5-cgcrg   1/1       Running            0          5m
puzzle-autoscale-5-cmzcp   1/1       Running            0          1m
puzzle-autoscale-5-jmbm5   1/1       Running            0          10m
puzzle-autoscale-5-ktt7v   0/1       ImagePullBackOff   0          1m
puzzle-autoscale-5-mtpzz   1/1       Running            0          1m
puzzle-autoscale-5-rt9f6   0/1       ImagePullBackOff   0          1m
puzzle-autoscale-5-sqdv2   1/1       Running            0          5m
puzzle-autoscale-5-v6p5l   1/1       Running            0          5m
PHP Welcome Page benchmark test
oc new-app openshift/php~https://github.com/christianh814/welcome-php
openshift/php- This tells OSEv3 to use the PHP images stream provided by OPENSHIFT.- Provide the git URL for the project, syntax is "imagestream~source"
Once you created the app, start your build:
oc start-build welcome-php
Track the build progress:
oc logs -f bc/welcome-php
Once the build completes, expose the route:
oc get svc
oc expose svc/welcome-php --hostname=welcome-php.apps.myopenshift.com
curl -v -k http://welcome-php.apps.myopenshift.com
Define the resource limits:
oc set resources dc/welcome-php --requests=cpu=200m,memory=256Mi
Set up the HPA:
oc autoscale dc/welcome-php --min 2 --max 6 --cpu-percent=75
Observe the HPA status:
watch oc get pod -l app=welcome-php
watch oc describe hpa/welcome-php
Use the Apache benchmark (the ab command):
ab -n 5000000 -c 500 http://welcome-php.apps.myopenshift.com
# -n: the total number of HTTP requests
# -c: the number of concurrent requests

# Observe
watch oc get pod -l app=welcome-php
watch oc adm top pod -l app=welcome-php
Observe the status by Prometheus grafana
# oc get route -n openshift-monitoring
...
grafana             grafana-openshift-monitoring.apps.myopenshift.com
Visit the page of https://grafana-openshift-monitoring.apps.myopenshift.com to observe the performance.
Or use the docker stats command to view the resource consumption of the
containers:
# Locate the node which the pod is running on:
oc -n hello get pods -o wide

# Connect to the node:
ssh node.myopenshift.com

# Locate the Docker container ID
docker ps | grep puzzle-2-9xslr | awk '{print $1}'

# Use the docker-stats to view the resource consumption
docker stats 8b7298bf3150 --no-stream=false
Here are the previous installation steps that is deprecated, just for reference.
# Clean previous setup
ansible-playbook \
    /usr/share/ansible/openshift-ansible/playbooks/metrics-server/config.yml \
    -e openshift_metrics_server_install=False \
    -e openshift_metrics_install_metrics=False

# Run playbook in master-node as follows:
cd /usr/share/ansible/openshift-ansible
ansible-playbook \
    -i /etc/ansible/hosts playbooks/openshift-metrics/config.yml \
    -e openshift_metrics_server_install=True \
    -e openshift_metrics_install_metrics=True \
    -e openshift_metrics_start_cluster=True \
    -e openshift_metrics_duration=1 \
    -e openshift_metrics_resolution=10s \
    -e openshift_metrics_hawkular_hostname=hawkular-metrics.apps.myopenshift.com \
    -e openshift_metrics_cassandra_storage_type=emptydir

# Use 'watch' to check the status of pos every two seconds
watch oc get pods

# Cleanup if necessary
# 1st clean
ansible-playbook \
    /usr/share/ansible/openshift-ansible/playbooks/metrics-server/config.yml \
    -e openshift_metrics_server_install=False \
    -e openshift_metrics_install_metrics=False

# Double clean
ansible-playbook \
    /usr/share/ansible/openshift-ansible/playbooks/metrics-server/config.yml \
    -e openshift_metrics_install_metrics=False

# Guarantee cleanup
ansible-playbook \
    /usr/share/ansible/openshift-ansible/playbooks/metrics-server/config.yml \
    -e openshift_metrics_server_install=False \
    -e openshift_metrics_install_metrics=False
6.2.6 Create the puzzle-master-node pod
# Prepare the run-master.sh, puzzle-master-entry.sh, Dockerfile-master
docker build -t puzzle-master:v3.16 -f ./Dockerfile-master .
docker tag puzzle-master:v3.16 172.30.151.202:5000/hello/puzzle-master:v3.16
docker login -p `oc whoami -t` -u system 172.30.151.202:5000
docker push 172.30.151.202:5000/hello/puzzle-master:v3.16
oc new-app hello/puzzle-master:v3.16 --name=puzzle-master -e PUZZLE_CLUSTER=172.30.63.122
oc expose svc/puzzle-master

# Record the service ip
oc get svc
6.2.7 Create the front-end web pod
Download the Apache docker image
docker search --filter is-official=true --filter stars=3 apache
docker pull docker.io/httpd
docker images

docker run --rm -dit --name apache-test -p 8080:80 \
       -v /opt/docker/apache:/usr/local/apache2/htdocs:rw httpd:latest bash
Test & update the image. Prepare /opt/docker/apache/docker.html:
<!DOCTYPE html>
<html lang="en">
<head>
    <meta charset="UTF-8">
    <title>Hello Docker</title>
</head>
<body>
    <h1>Hello Docker</h1>
</body>
</html>
Run the apache image:
docker run --privileged --rm -dit --name apache-test -p 8080:80 \
       -v /opt/docker/apache:/usr/local/apache2/htdocs:rw httpd:latest
Test by curl:
curl -k 127.0.0.1:8080/docker.html
Update the Apache image:
docker exec -it <container> bash
cat >/etc/apt/apt.conf.d/proxy.conf <<\EOF
Acquire {
  HTTP::proxy "http://tinyproxy@password@192.168.19.19:8888";
  HTTPS::proxy "http://tinyproxy@password@192.168.19.19:8888";
}
EOF

apt-get update
apt-get install -y vim
apt-get install -y ncat
apt-get install -y ksh
apt-get install -y telnet
apt-get install -y telnetd

# Edit the /usr/local/apache2/conf/httpd.conf file
/usr/local/apache2/bin/apachectl -k graceful

# Capture the container to new image
docker commit <container> httpd:v1
docker tag httpd:v1 172.30.151.202:5000/hello/httpd:v1
docker login -p `oc whoami -t` -u system 172.30.151.202:5000
docker push 172.30.151.202:5000/hello/httpd:v1
oc new-app hello/httpd:v1 --name=myweb
oc expose svc/myweb

# Update the environment variable (puzzle-master-node ip)
# Note: will rollout update the pod.
oc set env dc/myweb PUZZLE_MASTER=172.30.218.85
# Unset the env
# Note: will rollout update the pod.
oc set env dc/myecho PUZZLE_MASTER-
Update the pod and push image:
# Get token from master node
oc login -u system -p admin
oc whoami -t
<token>

# Locate the OCP node that running the node
oc get pods -o wide

# Capture the image from running container in the OCP node
docker ps # get container id
# Double confirm the container
docker exec -it <container> hostname

# Capture the image in the OCP node
docker commit <container> httpd:v2
docker tag httpd:v2 172.30.151.202:5000/hello/httpd:v2
docker login -p <token> -u system 172.30.151.202:5000
docker push 172.30.151.202:5000/hello/httpd:v2

# Redeploy web-app in the master node
oc new-app hello/httpd:v2 --name=myweb2
oc expose svc/myweb2
Login http://myweb-hello.apps.myopenshift.com/ to test application.
7 Connect to the external database
7.1 Configure the PostgreSQL
# Pull the docker image
docker search --filter is-official=true --filter stars=3 postgresql
docker pull docker.io/postgres
mkdir -p /opt/docker/psql/data

# Bind the network to the host's network (--network host)
docker run -it \
       -v /ose/psql/data:/var/lib/postgresql/data \
       -v /ose/public:/data \
       --rm --name postgres-db --privileged \
       --network host -e POSTGRES_PASSWORD=mysecret postgres:latest bash

# Setup the configure file
vi /var/lib/postgresql/data/postgresql.conf

# Startup PostgreSQL database
cat ~postgres/.bash_profile
export PATH=/usr/lib/postgresql/12/bin:$PATH

chown postgres:postgres ~postgres/.bash_profile

su - postgres
$ pg_ctl restart -D /var/lib/postgresql/data
$ createdb mydb
$ psql mydb
mydb# create table puzzle (
    id serial primary key,
    solution varchar(60) not null unique
);

# Detach the running image
Press <CTRL-p><CTRL-q> key sequence

# Save & load the image to external machine
# In souce node
docker save postgres:v3 >postgres-v3.tar
# In destinate node
docker load <./pospostgres-v3.tar
7.2 Using psycopg2 with PostgreSQL
Install the module:
apt-get install python3 python3-pip
pip3 --proxy http://user:pass@192.168.19.19:8888 install psycopg2-binary
Copy & query the PostgreSQL: see scripts in web-conf.